AWS SSO and Jenkins
One of the benefits of using Amazon’s SSO (Single Sign On) service is the ability to use it to provide authentication to other applications via the SAML2 protocol. It has several custom apps “build-in” and ready to go; Dropbox, G Suite, Jira, and Slack are some of them. Unfortunately, that list doesn’t include Jenkins, my favorite CD/CI platform. Fortunately, you can add your own “custom” applications, without too much trouble.
AWS SSO
We’ll start on the AWS side. This guide assumes that you already have your SSO service configured and working with your AWS accounts and/or other applications.
Here is what you need to do:
Create the custom app
- Sign into your AWS SSO console.
- Choose the “Applications” section and click the “Add a new application” button.
- Search for the application you want to install; in this case Jenkins. At the time of this post there is no “Jenkins” application so you have to click the “Add a custom SAML 2.0 application” link instead.
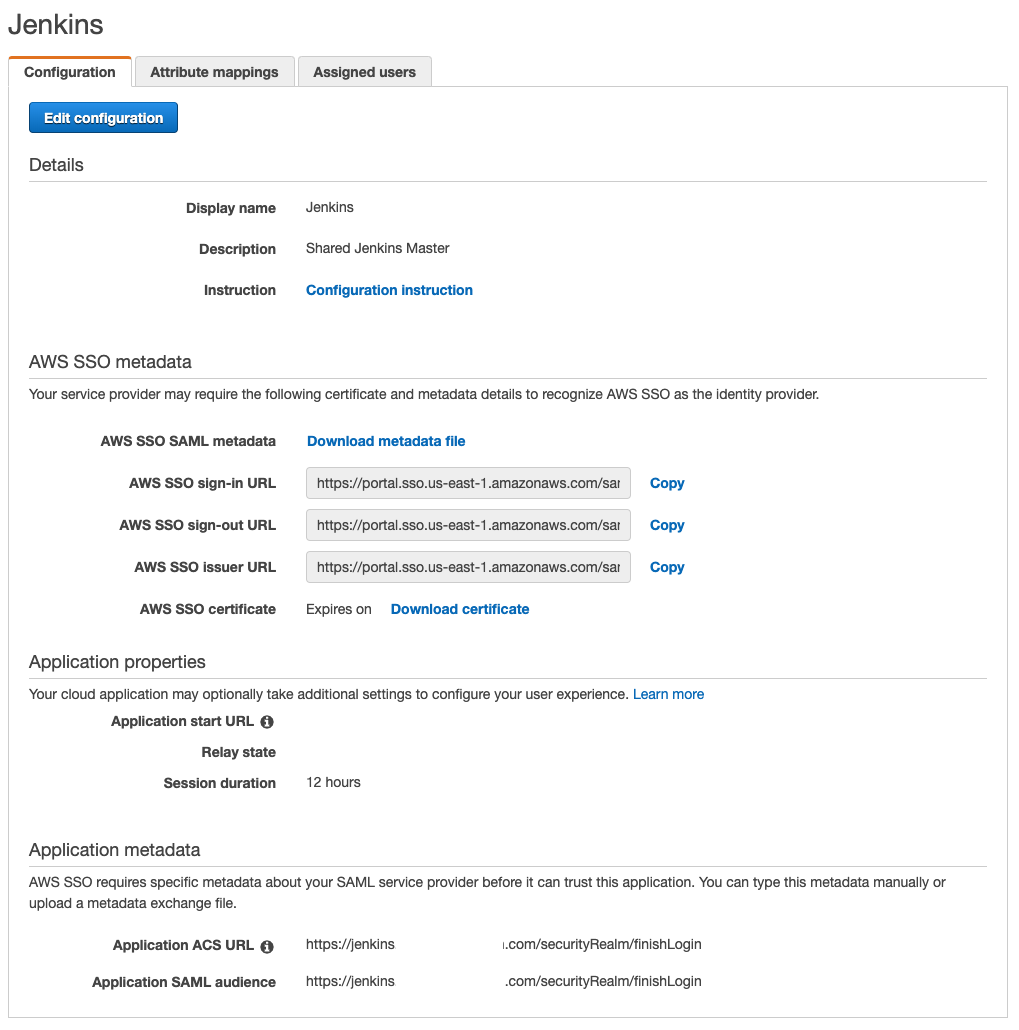
- Fill in the details on the form as follows:
- Display Name: this is the name that your users will see in the AWS SSO dashboard. I used “Jenkins”.
- Description: just some description on what this application is. I don’t even know where this is show to the users so I don’t think it’s too important.
- Application Start URL: leave blank
- Relay State: leave blank
- Session duration: This is the amount of time someone can stay logged into Jenkins without having to re-authenticate. I set mine to 12 hours for convenience.
- Application SAML metadata file: you can grab this from your Jenkins install or just use what I did: “https://
/securityRealm/finishLogin"
- Download the “AWS SSO SAML metadata” file and save it for later; we’ll need this to set up the Jenkins SAML config.
- Copy the “AWS SSO sign-out URL” and save it for later; we’ll need this to set up the Jenkins SAML config.
- Save the form and ignore the warnings about having to set up attribute mappings.
The resulting configuration should look something like this:

Attribute Mappings
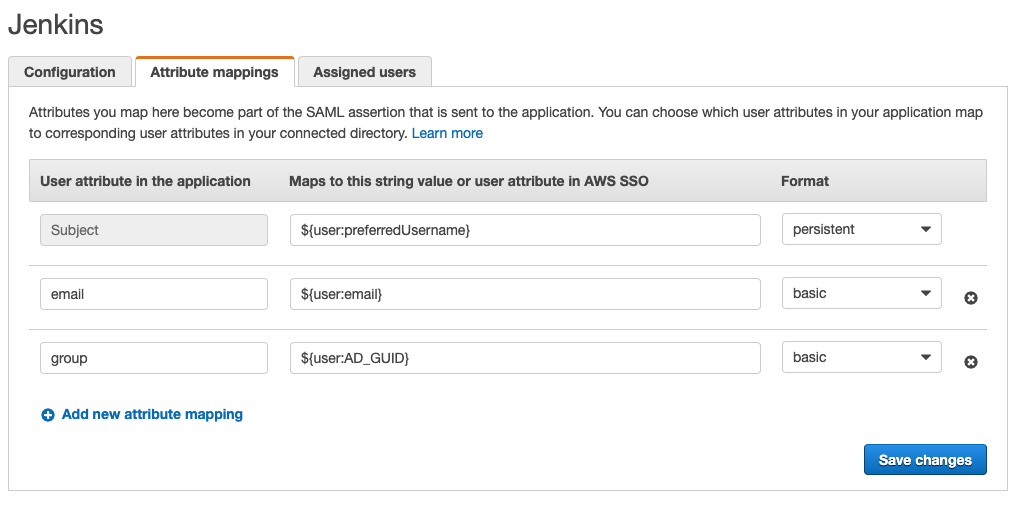
This is where you can add “extra” things to send to Jenkins. Right now there AWS SSO doesn’t provide very many attributes that would be useful to a Jenkins install so the only things we really use are the Subject (used for the Jenkins username) and “email”.
- Fill in the details of this form as follows:
- Subject: this is used for the Jenkins “username”. I choose to use the users name from my AWS SSO configuration: “${user:preferredUsername}”. Other options might be “${user:firstName}${user:familyName}” or even “${user:email}”.
- email: this is used for the Jenkins “email” setting for each user.
- group: since AWS SSO doesn’t support “group” attributes at this point, this is just a “filler” attribute and is not used for anything real in Jenkins. If/when AWS decides to increase their attributes to include group information, you could use this setting to allow group authentication in Jenkins.
- Hit the “Save changes” button.
The resulting configuration should look something like this:

Assigned Users
The last step is to allow users to use the Jenkins application. This setting determines who sees this application on their AWS SSO console. It’s pretty straightforward and doesn’t need a lot of explanation.
- Click the “Assign users” button
- Select the users and/or groups that you want to be able to log into Jenkins.
- Click the “Assign users” button at the bottom of the page.
The resulting configuration should look something like this:

Jenkins
Again, this guide assumes that you have Jenkins installed and running.
Make sure you have the “Authorization” set to “Anyone can do anything” - locking yourself out of Jenkins is no fun!
Complete these steps:
- Log into your Jenkins install as someone who can install plugins and manage the system.
- Install the “SAML Plugin”
- Go to the “Configure Global Security” section and choose “SAML 2.0” as your security realm.
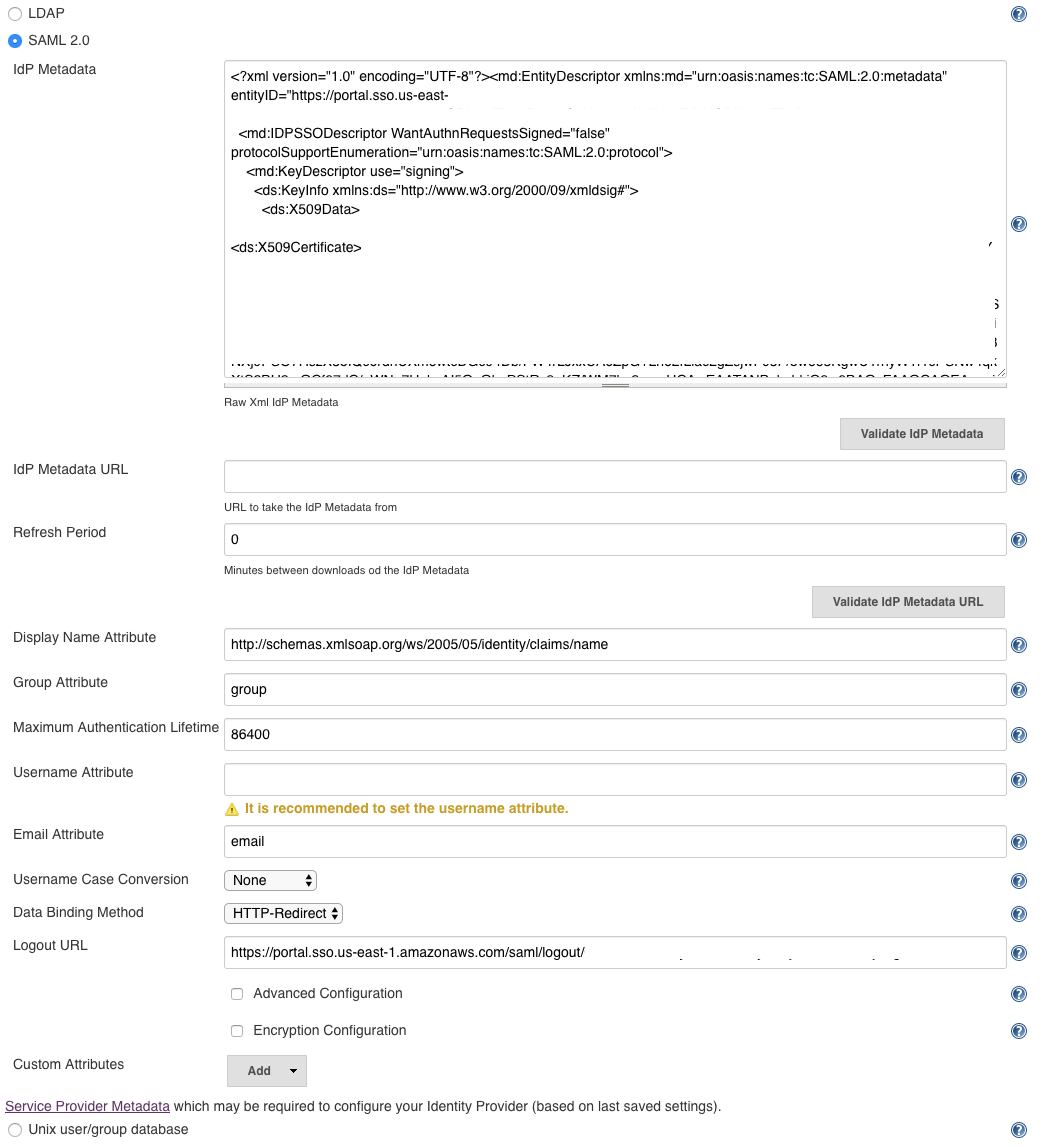
- Fill in the details on the form as follows:
- IdP Metadata: This is the XML “AWS SSO SAML metadata” file you downloaded from the AWS SSO console. Click the “Validate IdP Metadata” to make sure everything is working so far.
- IdP Metadata URL: You can choose to have Jenkins periodically refresh the SAML metadata file. I didn’t choose to do this.
- Refresh Period: This is how often the IdP Metadata is refreshed.
- Display Name Attribute: leave it at the default value.
- Group Attribute: AWS SSO doesn’t support “groups” at this time so it doesn’t really matter what you put here. I created a custom attribute mapping in the AWS SSO console, but it doesn’t really do anything useful.
- Maximum Authentication Lifetime: This sets how long someone can stay logged in without have to re-authenticate.
- Username Attribute: I left this blank but you could create a custom attribute mapping and use that if you wanted to.
- Email attribute: I created a custom “email” attribute mapping for this setting.
- Username Case Conversion: leave at the default value
- Data Binding Method: leave at the default value
- Logout URL: this is the “AWS SSO sign-out URL” that we copied from the AWS SSO config page above.
- You can add “custom attributes” if you want, but since the AWS SSO SAML configuration doesn’t support very many attribute mappings, it doesn’t really add a lot of value. YMMV.
- Hit the Save button at the bottom of the page.
The resulting configuration should look something like this:

Finalizing
Congratulations, you should be good to go now! Log into your AWS SSO console, choose Jenkins, and watch as it opens a new tab in your browser and logs you into Jenkins as a new user.
NOTES
- Jenkins creates a new user when you first log into using the SAML interface. If someone needs access to your system, they should log in using the AWS SSO console first, then you can configure their security.
- Don’t leave your Jenkins security set to “Anyone can do anything”! Once you get this working choose a more secure “Authorization” config. I use the “Role-Based Strategy” but you can use any one that fits your organization.
